|
In order to ensure that you are consistently able to make high quality, high proof alcohol fuel (ethanol), at a pre-determined
range of 160 to 180 proof, it is important to understand the functions of the various sections of the still before you get
started.
Furthermore, we must realize that in order to make our own alcohol fuel to replace or displace the use of gasoline (petrol),
we must produce uniformly high quality fuel, so we need to understand this process. Running a still is actually a fun thing
to do, as it gives you an incredible sense of self-reliance. The first time you pour some home-brew in your car or truck,
and realize how much power you have (the same horsepower as before), it is really a great feeling! Also, you can make this
fuel for $0.85/gallon or less!
Dimensions on the blueprints are provided for a reason, even if it may not seem exactly clear as you proceed with this
project. A 1/4 inch tolerance of error may be allowed on vertical dimensions. But, when you are drilling holes through the
3-inch copper pipe, the hole size must be precise! The places where a pipe extends through the curved wall of the 3 pipe must
be pretty much a press-fit if you expect to get the solder to take and form a good joint. The still actually has no moving
parts, unless you count the slight movement of the cooling coils, which do expand and contract a little as the temperature
changes.
I apologize in advance for my readers in other parts of the world for not using metric measurements, but even though
I could, I'm not as familiar with standard plumbing and pipe sizes in the world of metrics. So, measurements are given as
US standards.
A still, or distillation column, is mostly a temperature-controlled chamber where alcohol vapors and water vapors may
separate, each according to its inherent boiling point/condensation point. For example, at sea level, water boils at 212F
(100C). Steam, on the other hand, condenses into water also at 100 C. Heat is easily lost if it has somewhere cooler to go.
Because the still is made out of copper pipe, which is a good conductor of heat, some of the heat is lost through radiation
out into the atmosphere. It is important to remember this, as this will be a factor on very cold or windy days, and you will
find that you have to adjust your temperature control valve a little differently than the setting for summertime operation.
The other place the heat escapes, by design, is into the cooling water flowing through the 1/4 inch copper tubing coiled up
on the inside of the still. Since this will normally be either pressurized city water or well water (because you need to hook
up your garden hose to the hose fitting on the temperature control valve), it is clean hot water. When we traveled with our
still and demonstrated it at county fairs, we would use this hot water to make instant coffee or tea. If you are going to
be running several batches of mash, you may want to use this heated water to warm up whatever dry feedstock you are going
to use and facilitate your mixing process prior to adding enzymes or yeast. This is really a very small amount of hot water,
but for efficiencys sake, we do like to recover and use whatever heat energy we can. The subject of enzymes and yeast is thoroughly
covered in the Alcohol Fuel Manual, which you may download from the Journey to Forever Web site.
Pure alcohol boils at 174 F (78.9 C). Conversely, alcohol vapors condense into a liquid at 174F (78.9 C). To be perfectly
accurate in the real world of observation, it has to be a little beyond the point of condensation. In the actual operation
of this still, you want to keep the temperature just above this point, because control point is measured below the condenser
and at the very top of the reflux column, where you want the alcohol steam to be hot enough to continue to rise into the
condenser. Therefore, the control valve should be set to open at 176 F (80 C), at sea level. If you are living in the mountains,
you will have to adjust the temperatures to allow for the fact that water boils at a lower temperature at high altitude. In
Denver, Co , the mile high city (5,280 ft elevation), water boils at only 190F (87.8 C) degrees. This means that the control
setting for the still is also much lower, around 154F or 155F (68 C).
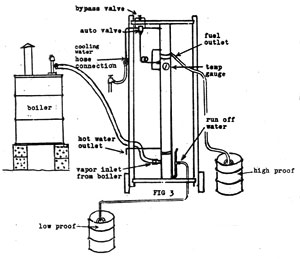
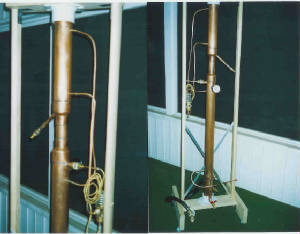
The still is divided up into three main sections. The bottom section is labeled the bubbler, (it can also be called a
doubler, because this little section is where the steam first enters the still, and immediately doubles in concentration of
alcohol vapors). The 3/8 inch threaded female adapter near the bottom is where a high temperature type hose shall be attached.
This hose is what conveys the hot steam from the top of the cooker to the still. As the hot steam enters the still, it is
immediately directed downwards by the 90 degree fitting. This bottom section is filled with cold water just before the distillation
process is started. A little more than a quart of water is added through the 45 fitting just exactly opposite where the high
temperature hose attaches. If you have followed the dimensions properly during construction, at the point which too much water
is added, it will then leak out the tee fitting just below the 45 fitting. This is the proper water level.
This small amount of water initially acts as a vapor trap, which effectively keeps the alcohol vapor from being lost prematurely
before the water temperature is high enough. When you first start the cooker to boiling, the alcohol starts boiling before
the water does, theoretically. In actual practice, the alcohol is thoroughly dissolved in the water, so what actually happens
is that the mash solution in the cooker boils at a slightly lower temperature due to the 5 to 10% amount of alcohol in solution.
As the beer solution in the cooker first starts to boil, the alcohol starts to come out of solution. However, we do not want
this vapor to escape just yet, before we establish an equilibrium temperature within the entire still, hence the water trap.
This, then, is the first function of the doubler.
The second function of the bubbler is to strip water content out of the steam. When the beer in the cooker does reach
a full rolling boil, the pressure starts to rise and the steam has to go somewhere. We direct it downwards into the water
trap, because the liquid water will cool the steam. This steam is immediately cooled down as much as 10 degrees (it really
wont have time to be cooled down more than that) and this will effectively remove half of the water content of the steam.
Now, when steam hits a liquid it is going to be under pressure, and it wants to displace that liquid and drive it upwards.
So, we try to baffle the flow of the steam so that a little bit has a chance to escape out the sides, and go up, since this
is where it wants to go (heat rises). This is the purpose of the little holes you will drill in the bottom side of the ninety
degree elbow and also in the 1/2 inch reducer below it. Some of the steam is then allowed to escape upwards, instead of having
to go the extra inch or two downwards. You will also need to drill a single 3/16 hole at the top corner of the ninety degree
elbow (I will remind you about this later on) as this allows a small bit of steam to go immediately upwards and thus hasten
the upwards movement and start warming the upper sections.
Now, just below that 3/4 inch ninety degree elbow, is the baffle plate which acts to deflect the steam back upwards, so
that we do not lose it out the blow-off. The baffle plate is actually a stainless steel shower drain cover plate, which you
will find in the plumbing section of your local hardware store. You need to buy two of them: one 3 inch, which exactly fits
into the coupling which joins the top of the bubbler section with the bottom of the reflux column. The other should be 2 diameter.
If you have trouble finding this smaller size, and you may, you may buy two of the 3and cut it down to a smaller diameter
with a pair of tin snips or metal shears. The other possibility for making this baffle plate is to use a piece of copper
plate which can be cut to size and drilled with a whole lot of holes. This baffle plate is supported by a short piece of 3/4
inch copper pipe, which is surrounded by three or four copper or brass Brillo pads (or brass or copper lathe shavings).
The Brillo pads should be readily available at a grocery store, but do not buy or try to use the kind of scouring pads which
are nothing but steel wool, as the steel will soon corrode and dissolve into a pile of rust rather quickly. I will discuss
the drain port and the condensed water run-off (the one-half inch pipe and tee fittings on the right side of the bubbler section)
later on when we discuss the actual operation of the still.
So, assuming we are working at sea level, the middle section needs to stay hotter than 174F, so that the steam is still
steam and continues to rise into the very top-most section of the still. Notice that the alcohol drain fitting, which consists
of a 1/2 inch pipe coming out of the lowest point of the top section of the still (it is labeled fuel outlet in Figure 1,
above) is the only place the still is completely open to atmosphere. Therefore, this opening is the path of least resistance
for the steam and thus the steam wants to rise and exit out this hole. However, the key to obtaining very high proof alcohol
is to keep the temperature of entrance to this top section just above 174 F, so that the alcohol is still steam and will rise
into the top section. Therefore, you want the temperature of this area just below the transition between the mid section and
the top section to be exactly 175F (80 C), as measured both by the temperature gauge which you can see, as well as the temperature
probe for the automatic control valve. At this temperature, 176 F, the alcohol is still a vapor, but the water is a liquid,
so it falls back down to the bottom of the still. You will be removing so much water from your barrel of boiling beer that
the extra amount of water has to drain off somewhere, so this is why you have a condensed water runoff which is so labeled
in Figure 1, near the bottom.
During the distillation process, the whole point is the establish a dynamic equilibrium in the temperature probe area
of the still. You have an automatic control valve which responds instantly to temperature change, so this is what cools the
212F steam down to precisely 175 F. Then the steam is almost pure alcohol vapor steam, and rises into the top section where
the coldest water from the garden hose enters first. The very top chamber, the condenser, is somewhat thermally isolated from
the rest of the still, as it has to remain several degrees cooler than the reflux section below.
The top section of the still is pretty easy to understand. It is capped at the top with a soldered fitting, and it only
has one opening to the outside: the fuel outlet, which consists of a copper pipe which is angled down at a 45 angle. You will
attach a 5/8 diameter clear vinyl plastic hose to this short piece of pipe, and run this down to the 5 gallon glass bottle,
or whatever container you will use to catch your high proof alcohol. We dont like to catch or store alcohol in steel fuel
cans, as it is a bit corrosive (but not as corrosive as methanol), and will rust out the cans. Glass 5-gallon water bottles
work pretty well, but you might crack one if you change the temperature too abruptly. The condensed hot alcohol enters slowly,
when you are cooking off 50 gallon batches of beer, and so the glass warms up gradually and isnt a problem.
The condenser section cooling coil first receives the cold water from the garden hose via the automatic temperature control
valve, and initially enters the top of the top condenser section of the still. It is a short section of coil, since the condenser
section is also fairly short. Then the cooling water exits this section and re-enters the reflux section just below the temperature
probe. The fuel outlet has to be at the lowest point of the condenser section, so that you dont have trapped alcohol left
inside the still when you are finished. There is one other detail to this condenser section: while you want the opening between
the reflux section and the condenser section to be as wide open as possible, there has to be a physical barrier to the packing
materials. This is so that if you lay the still down horizontally for transporting it, the packing materials are not allowed
to migrate into the upper condenser section. You will notice this in a written note near the top of Detail number 1 in the
drawing.
There is one other aspect of the action that takes place in the condenser: when steam condenses from a gas into a liquid:
the volume is decreased by a factor of 1800 times. This means that once alcohol starts condensing (you will see the clear
liquid through the clear vinyl tubing attached to the fuel outlet) it is creating a partial vacuum, except for the fact that
it is open to atmosphere. However, when the alcohol flows out the fuel outlet, this momentarily blocks air coming in, and
the momentary vacuum helps to pull the steam below into the condenser section. This is a desirable effect, if the vapor just
below the condenser is pretty much pure alcohol, as it helps the still to work more efficiently.
It is possible that this steam in the temperature control zone is too high in water content because the bottom section
of the still is not sufficiently cooled. The only way that you would know that this is happening is by seeing that the proof
is not as high as you were trying to achieve (just remember that when you are measuring hot alcohol, you have to consult a
temperature conversion table to allow for the temperature effects on the hydrometer). The only reasons possible for this condition
are (1) the temperature valve is not set to the right temperature, or (2) the boiler is putting out much too much heat for
the volume of steam to be cooled by this still. Typically, all you have to do is to pay a little more attention to the operation
of the automatic control valve, by making tiny adjustments and then watching the temperature gauge at the same instance that
the valve is opening to release cooling water into the still. The second possibility may happen because you are boiling the
mash much too fast. If you are using a gas flame, you can turn down the flame. If you are burning wood, your adjustments may
be limited to closing the smoke pipe damper, or pulling out the firebox drawer (if you follow my recommendation at making
a safe and effective wood burning setup). If you have access to scrap wood (old pallets, shipping cartons, construction waste,
etc) this is free fuel, further reducing the cost of the finished product.
So far, we have discussed the top and bottom section of the still, but have not discussed the middle section, called the
reflux section. The term reflux refers, in the distillation literature, to the phenomenon of the up and down action of the
steam vapors, where the steam which is being driven upwards is competing with condensed water falling downwards. The work
reflux means, to flow back or return, especially to heat so that the vapors condense and return to be heated again. (Merriam-Websters
Collegiate Dictionary). The reflux section has the largest portion of the coiling coils, as this is where the greatest temperature
change must occur, in this chamber. The lower two-thirds of this chamber is also filled with an inert packing materiel. This
packing material does two things, actually. The first purpose is to provide a surface area on which the steam may condense.
Secondly, but related to this first one, is that the packing material provides a cooler surface (initially) which will cool
the steam. After the still has been in operation for twenty or thirty minutes, the steam has likely heated up the packing
material quite a bit, so this function becomes less important. However, we are still interested in providing a maximum amount
of surface area on which the water molecules may land and condense. At the same time, the packing material must not be so
compacted that it blocks the movement of steam.
Because the cooker has an external heat source, additional heat energy is constantly being fed into the still in the
form of live steam, and it comes in at the bottom of the still. Cooling water is circulating through the inside of the still,
and thus, the small portion of the steam which contacts with the water cooling coil will immediately condense. This water
starts falling down towards the bottom of the still, but, because of the packing material, it doesnt fall freely: it merely
drips from one piece of packing material onto the piece below it. Now, this water which is dripping downwards cools the steam
water rising upwards, but the steam is at the same time transferring its heat to this condensed water, giving up some of its
energy. The whole idea here is to create some turbulence and interaction between liquid condensed water and the water content
of the steam. Every time steam heats water, it gives up energy. And yet, we dont want it to give up so much energy that we
are condensing the alcohol vapor prior to reaching the upper chamber. Thus, if some of the alcohol vapor has been condensed,
and is falling downwards, it gets caught on the surface of the packing materials and re-heated so that the alcohol turns back
into steam and rises to the top of the reflux chamber. This last statement is the primary reason for the purpose of the reflux
chamber.
We have a huge range of temperature between the condensing points of water and alcohol. 212 F minus 174 F is a 38F (20C)
temperature range. Now, the length of the reflux chamber is a critical factor, as we likely have a temperature quite close
to 212F at the very bottom of the still where the live steam is rolling in, while near the top of the reflux column, we are
trying to closely control this temperature within one-half a degree of our desired 176 F. Before the advent of automatic
control valves, this was not an easy objective to achieve. On the other hand, most of the alcohol which was home distilled
was of a much lower proof, for drinking purposes. You will be surprised at the clarity and purity of the high proof alcohol
which this still produces. However, 180 proof grain alcohol is too potent to drink (it will dehydrate body tissues at an alarming
rate, especially in the throat and esophagus region). It is also possible that small amounts of methanol (wood alcohol) and
fusel oils are present, although normally when the still is functioning properly, these are removed in the bottoms water in
the bubbler section.
Now, there are a couple of minor but key points to the functioning of this still to which attention must be paid. You
will likely notice that the bottoms water does smell a lot like the original beer mash solution, and if you measure it with
your alcohol hydrometer when you are done, you will see that you do have a little bit of alcohol in the bottoms water. You
need to save this and add this to your next batch. However, if you are saving this water by attaching a clear plastic hose
to the pipe fitting (labeled condensed water run-off on Figure #1 on the drawing) you must make sure that this hose does not
go uphill, before it goes down into the bucket or catchment container. This is very important, as for example, if this hose
runs up over the side of a tall bucket before it drains into the bucket, you have just effectively altered the water level
inside the bubbler section. We want this level to stay consistent with the height of the condensed water runoff port, otherwise
we may be cooling the steam too fast, with too much contact time with the bottoms water. You may find that the still is a
little easier to operate if you elevate it about eight or ten inches above ground level, for example, by sitting it on top
of a couple of concrete blocks. Then you have enough room to use a large bucket for the condensed water run-off. You may also
need to have an extra bucket in case this first one fills up, because it may contain perhaps 5% alcohol, and you want to save
this to add it to your next batch.
How much alcohol can you expect to make with this still? It all depends on how much feedstock you have available to ferment
to make alcohol. If you start with 100 gallons of very high sugar content fruit, such as culled peaches grapes, you may have
such a high sugar content that you can get 12 or even 14% alcohol content. Above 14% alcohol is pretty difficult to obtain
as the alcohol content gets so high that the yeast starts to die off in the presence of their own waste product (alcohol is
the pee of the yeast organism, remember?). But, for illustrative purposes, lets us say that you have 10% alcohol shown on
the hydrometer that you have floated in your mash solution. If you have 100 gallons of this, the 10% is 10 gallons of high
proof fuel, approximately. The actual formula, it you are trying to make 180 proof (90 % ethanol) in this case would be (100
gal x .10 ) / .9= 11.1 gallons of 180 proof.
If you are trying to make 160 proof (80 % alcohol, which makes an excellent, very economical fuel (more about that later
on) and you were using culled pears as a feedstock (they are lower in sugar, likely yielding around 7.5% alcohol in the Balling
hydrometer) then your expected yield would be (100 gal x .075)/.8 = 9.4 gallons of 160 proof.
The first few times you run this still, it is recommended that you run small batches of 50 gallons of mash at a time,
until you get a little better understanding of the various procedures and tasks ahead of you. It may seem at first that it
is a lot of work to get only five or ten gallons of fuel, barely enough for an entire week of in-town driving. However, this
still is a serious, very high quality tool, capable of turning out 7.5 gallons per hour over a twelve hour period. For example,
if you had a 1,000 gallon tank of mashed and fermented culled pears, in a 12 hour run you would get 93.75 gallons of 160 proof
fuel. The formula, this time, would be 1,000 gal x .075) / .8 =93.75 gal.
With proper attention to engine conversion techniques, you can expect to achieve exactly the same or possibly better gas
mileage with 160 proof ethanol as you do with gasoline.
However, if you have a car that is less than 10 years old, it may be already set up for using E-85, which you can make
yourself. To see if your car is one of those which are factory-ready fro E-85, go to http://www.eere.energy.gov/cleancities/afdc/afv/models.html
If some of your fuel and feedstock inputs are free, then you only need to count your labor for obtaining supplies and
running the still. 94 gallons of gasoline now costs $1.54 per gallon for regular (as of Mar. 27, 2000). So 94 gallons at
$1.54 = $144.76 US. During the 12 hours of running the still, if you automate much of the process, then perhaps you will only
have 3 hours of actual work on and around the still, but it may well take you 9 or 10 hours on another day to gather and prepare
the materials, and to clean up afterwards. So, If you obtain $144.00 worth of essentially free fuel, and it takes you 14 hours
to do this, then you are making $10.00 / hour. This may or may not be worth your time. You may choose to pay an employee $7.00/hour
to do this work and make a profit of $3.00/hour off his time and your capital investment.
The assumptions in the previous paragraph assume that feedstock is free; but, in the real world, everything, even throwing
something away, has its price. I shall not go into details here, but we are in the process of posting other economic and
agricultural studies to this web site which demonstrates that even on a moderately small scale, fuel alcohol may be made (including
the cost of buying agricultural commodity feedstock, but also selling the distillation byproducts) for $0.85/gallon US.
One other major point about the economics of this particular still. Perhaps you find that you do have large agricultural
resources available for feedstock. So, you do some number crunching, and you find that in order to economically make the amount
of fuel you want and make the profit margin you need, that you need to make 75 gallons/hour. No problem! Just build ten of
these stills and run them in parallel! Better still, make the Big Brother version of this still and run five of them in parallel
for an output of 100 gallons of high proof , high octane (106 octane) fuel per hour. A modular approach will also save you
operational coasts as you can adjust flow rates and heating requirements according to the timing of when feedstocks become
available.
In later chapters I shall describe methods of handling batches of various types of feedstock, as well as how to change
this still from a batch process still into a continuos process still. The economic challenge of any tool or piece of machinery
is to fully utilize its inherent capabilities, and the more hours it runs, the more fuel and money it makes for you! In addition
to the standard industrial business model, we should also explore the farm co-op model, or even a food co-op model, as the
need for fuel is a common community need, and since vital and recyclable resources are spread throughout a community. A community
co-op run alcohol fuel still makes perfect sense as a way that we as a society can free ourselves from the shackles of a polluting
and militarized petroleum economy.
Safety and Boiler operations
|